> For the complete documentation index, see [llms.txt](https://captivatehelp.newbluelive.com/llms.txt). Markdown versions of documentation pages are available by appending `.md` to page URLs; this page is available as [Markdown](https://captivatehelp.newbluelive.com/solution-recipes/chapter-index/vmix-recipe.md).
# Add graphics to vMix productions
Most Captivate products let you output graphics to vMix via NDI. You can also animate graphics in and out and control your design’s variables from within the vMix interface. This article describes how to set up Captivate graphics in vMix.
{% hint style="info" %}
This recipe relies on NDI on both sides — Captivate as an NDI sender (Program Out > NDI) and vMix as an NDI receiver. Both machines must reach each other on the same network (or be the same machine), and any firewall between them must allow NDI’s discovery and stream ports. If you can’t run NDI in your venue, the Captivate side won’t appear in vMix’s source list.
{% endhint %}
* [Add a Captivate source](#add-a-captivate-source)
* [Edit graphic variables in vMix](#edit-graphic-variables-in-vmix)
* [Animate graphics in and out from vMix](#animate-graphics-in-and-out-from-vmix)
## Add a Captivate source
1. Open Captivate and create a channel of layers that you want to include in your vMix production. For details, see [Project List panel](/get-started/chapter-index-2/project-list-panel-and-channel-management.md).
2. In Captivate, set your output to NDI from the **Program Out** menu.
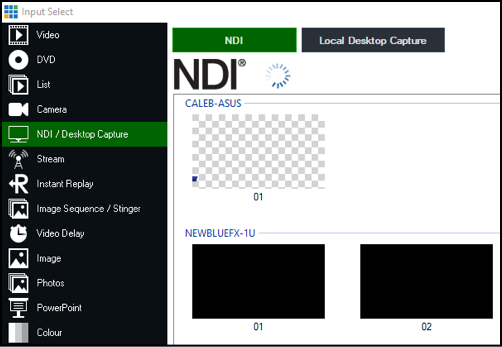
3. Open vMix and click the **Add Input** button. The Input Select window opens.
4. Click **NDI / Desktop Capture** and select your Captivate NDI source.
Your Captivate NDI source is now set up and ready to go.
## Edit graphic variables in vMix
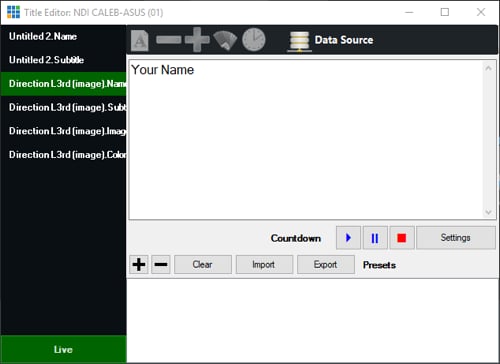
1. In vMix, right-click your Captivate NDI source and choose **Title Editor**.
Each variable in your graphic is listed on the left side of the Title Editor window.
2. Click a variable and overwrite the default value in the Title Editor to change the variable.
**Tips**
* To change text variables, overwrite the default text.
* To change image variables, enter the URL of a local image file.
* To change color variables, enter the hex value, preceded by the `#` symbol. For example, the hex value for blue is `#0000FF`.
## Animate graphics in and out from vMix
1. In vMix, right-click your Captivate NDI source and choose **Commands**.
The context menu includes Animate In, Animate Out, and Animate In/Out commands for up to five graphics in your Captivate Project List.
2. Choose **AnimateIn** from the context menu to push a graphic in your Project List live with animation.
3. Choose **AnimateOut** from the context menu to end a graphic.
---
# Agent Instructions
This documentation is published with GitBook. GitBook is the documentation platform designed so that both humans and AI agents can read, navigate, and reason over technical content effectively. Learn more at gitbook.com.
## Querying This Documentation
If you need additional information that is not directly available in this page, you can query the documentation dynamically by asking a question.
Perform an HTTP GET request on the current page URL with the `ask` query parameter, and the optional `goal` query parameter:
```
GET https://captivatehelp.newbluelive.com/solution-recipes/chapter-index/vmix-recipe.md?ask=&goal=
```
`ask` is the immediate question: it should be specific, self-contained, and written in natural language.
`goal` is optional and describes the broader end goal you are ultimately trying to accomplish on behalf of the user. GitBook uses it to tailor the answer towards what is most useful for that goal.
The response will contain a direct answer to the question and relevant excerpts and sources from the documentation.
Use this mechanism when the answer is not explicitly present in the current page, you need clarification or additional context, or you want to retrieve related documentation sections.