> For the complete documentation index, see [llms.txt](https://captivatehelp.newbluelive.com/llms.txt). Markdown versions of documentation pages are available by appending `.md` to page URLs; this page is available as [Markdown](https://captivatehelp.newbluelive.com/set-up-your-production/set-up-your-project.md).
# Set the project format
A project’s **video format** defines the frame Captivate renders before anything goes to an output, and it shapes every part of the project from the inputs to Program Out. Set it before you configure any output.
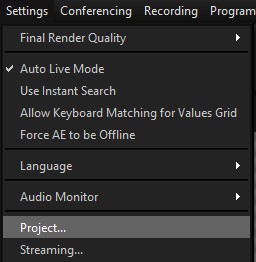
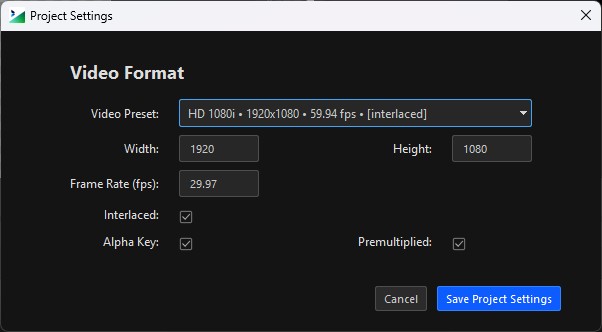
Open **Settings** > **Project…** to open the **Project Settings** dialog.
The dialog’s **Video Format** section holds the settings every output depends on. The quickest way to set them is to pick a **Video Preset** that matches your delivery format — that fills in **Width**, **Height**, **Frame Rate**, and **Interlaced** together. You can also set each field by hand.
## Resolution, frame rate, and interlacing
These are the most important settings and the least nuanced: match them to the format you’re delivering. Unlike the alpha setting below, they don’t just shape the output — they propagate inward through every part of the project.
* **Width** and **Height** set the canvas size every output renders at, and the size every live video input is scaled to. A 4K camera entering a 1080p project is downscaled at the input; a 1080p camera entering a 4K project is upscaled. There is no per-source resolution override.
* **Frame Rate (fps)** drives every output’s frame cadence and the cadence of cache pre-rendering. It also drives the Instant Replay memory budget — see [Set up Instant Replay](/set-up-your-production/chapter-index-4/instant-replay-configure.md) for buffer sizing.
* **Interlaced** sets interlaced versus progressive output. Most projects leave it off.
**⚠️ WARNING**\
Changing resolution or frame rate while a production is live is disruptive. Every live input re-allocates its capture buffer, so expect a glitch frame across all sources, and every graphic re-renders, so any graphic that was on air stops and has to be played on again. Change the project format between shows or before you go live — never during a live production.
## Working with alpha
The **Alpha Key** checkbox decides whether your output carries transparency. What it really comes down to is the role Captivate plays in your production:
* **Graphics source** — your graphics are composited over video somewhere else (a switcher, vMix, a downstream keyer). Turn **Alpha Key** ON so the output carries transparency.
* **Final renderer** — Captivate produces the finished frame (graphics already over video, or a full-screen graphic). Turn **Alpha Key** OFF.
If you’re not sure which role you’re in, see [Choose how Captivate fits your production](/set-up-your-production/how-it-fits-your-production.md). Alpha Key on is the default and the most common case.
### With Alpha Key on
* **NDI** and **OMT** carry transparency, so a receiver can key the graphics over its own video.
* **SDI** runs in **key + fill** mode by default, using two connectors — one for the key, one for the fill — for a downstream switcher’s keyer. On cards that support internal keying, you can instead turn on **Use Internal Keyer** under **Program Out** > **SDI Setup**: the card acts as a downstream keyer, taking the incoming program on one SDI connector and sending the keyed result out the other.
* **Display** output is composited over a blue or green chroma key or a black luma key background, so a downstream switcher can key the graphics from its HDMI input. The key-color choice appears in **Display Setup** when Alpha Key is on.
* **Image Sequence** and **Watch Folder** outputs write **PNG** files, which carry transparency.
* **OBS** — the NewBlue OBS plugin brings the graphics into OBS Studio with transparency.
{% hint style="info" %}
**Virtual Webcam** output is always opaque, whether Alpha Key is on or off. The receiving app — Zoom, Teams, Meet, a browser — composites the feed onto its own background, so it sits outside the Alpha Key choice.
{% endhint %}
### With Alpha Key off
* **NDI** and **OMT** send an opaque image with no alpha channel — more efficient than the transparent stream.
* **SDI** runs in **single-output-per-channel** mode — each Captivate channel maps to one connector instead of two.
* **Display** output shows the finished, opaque frame, with no key-color background.
* **Image Sequence** and **Watch Folder** outputs write **JPG** files: smaller, and with no transparency.
## Premultiplied
When Alpha Key is on, the **Premultiplied** checkbox chooses how the alpha channel is combined with the color values. Most downstream tools accept either setting; a few ask for one specifically. You normally don’t need to change it unless your receiving app shows incorrect edges — a fringe of black or white around graphics — in which case try toggling it.
## At a glance
| Output | Alpha Key on | Alpha Key off |
| ------------------- | --------------------------------------------- | ----------------------------------- |
| NDI / OMT | Carries transparency | Opaque, no alpha (more efficient) |
| SDI (DeckLink, AJA) | Key + fill on two connectors | One connector per Captivate channel |
| Display | Over a chroma or luma key background, keyable | Opaque finished frame |
| Image Sequence | `00001.png`, with transparency | `00001.jpg`, no transparency |
| Watch Folder | `.png` | `.jpg` |
| Virtual Webcam | Opaque (both modes) | Opaque (both modes) |
---
# Agent Instructions
This documentation is published with GitBook. GitBook is the documentation platform designed so that both humans and AI agents can read, navigate, and reason over technical content effectively. Learn more at gitbook.com.
## Querying This Documentation
If you need additional information that is not directly available in this page, you can query the documentation dynamically by asking a question.
Perform an HTTP GET request on the current page URL with the `ask` query parameter, and the optional `goal` query parameter:
```
GET https://captivatehelp.newbluelive.com/set-up-your-production/set-up-your-project.md?ask=&goal=
```
`ask` is the immediate question: it should be specific, self-contained, and written in natural language.
`goal` is optional and describes the broader end goal you are ultimately trying to accomplish on behalf of the user. GitBook uses it to tailor the answer towards what is most useful for that goal.
The response will contain a direct answer to the question and relevant excerpts and sources from the documentation.
Use this mechanism when the answer is not explicitly present in the current page, you need clarification or additional context, or you want to retrieve related documentation sections.