> For the complete documentation index, see [llms.txt](https://captivatehelp.newbluelive.com/llms.txt). Markdown versions of documentation pages are available by appending `.md` to page URLs; this page is available as [Markdown](https://captivatehelp.newbluelive.com/set-up-your-production/chapter-index/output-graphics-to-a-display.md).
# Output graphics to a display
Every Captivate license can route playout to a screen connected to your computer — HDMI, DisplayPort, or any other monitor connection. The Display output sends a full video frame over that connection, which fits two common roles:
* **Graphics contributor into an HDMI switcher.** When a downstream switcher has no key + fill, NDI, OMT, or SDI input but does have an HDMI input and can chromakey, Captivate draws your graphics over a chroma or luma key background and the switcher keys them over its program. This is common with compact HDMI switchers such as the Blackmagic ATEM and Roland lines. Turn the project’s **Alpha Key** on for this role.
* **Final output to a monitor or display.** Send a finished production to a confidence monitor, a projector, or a venue display — including when Captivate is the downstream graphics tool, overlaying graphics on a switcher program that came in (for example, an ATEM’s program over USB-C) and sending the result to a display while also streaming, or feeding the switcher back on another bus. Turn the project’s **Alpha Key** off for this role.
For how these fit the wider picture, see [Choose how Captivate fits your production](/set-up-your-production/how-it-fits-your-production.md).
## Set the display resolution and Display output
1. Set your destination screen’s resolution and refresh rate to match your project’s resolution and frame rate. On Windows, use **Display Adapter Properties**; on macOS, use **System Settings → Displays**. (Captivate renders graphics at your project settings, but the Display output follows the screen’s adapter settings, so the two need to match.)
2. In the Captivate playout window, click the **Program Out** menu and choose **Display**. The Display window opens and shows the color key plus any graphics that are currently live.
3. Drag the Display window onto your separate HDMI or DisplayPort screen, or onto whichever monitor your switcher / capture device is attached to. You can also pick the target screen from **Program Out** → **Display Setup** → **Video**.
4. Double-click anywhere in the Display window to expand it to full screen. Double-click again to return to the original size.
{% hint style="info" %}
The mouse cursor is hidden while it is over a program output window, so an accidental mouse-over doesn’t show up on air.
{% endhint %}
{% hint style="info" %}
**About the Program Out menu**: "Program Out" is the menu where you choose Captivate’s output destination — Display, NDI, SDI, virtual webcam, image sequences, and so on. It controls where the rendered playout goes.
{% endhint %}
## Select the color key
The color key is the background color shown behind your alpha-channel graphics, intended to feed a downstream chroma keyer. You can choose **Black**, **Blue**, or **Green**.
You can change the key color in two places:
* In the Captivate playout window, click the **Program Out** menu, choose **Display Setup → Key**, and select a color.
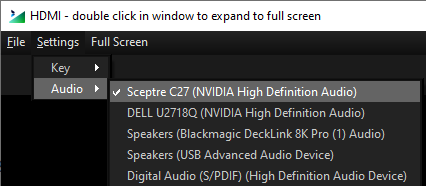
* In the Display window itself, open the **Settings** menu, choose **Key**, and select a color.
A key color change takes effect immediately on the running Display output — you don’t need to close and reopen it.
{% hint style="info" %}
The key color is used only when **Alpha Key** is on in [Project Settings](/set-up-your-production/set-up-your-project.md). With Alpha Key off, the Display output is an opaque finished frame and the key option is not shown.
{% endhint %}
## Choose the audio device
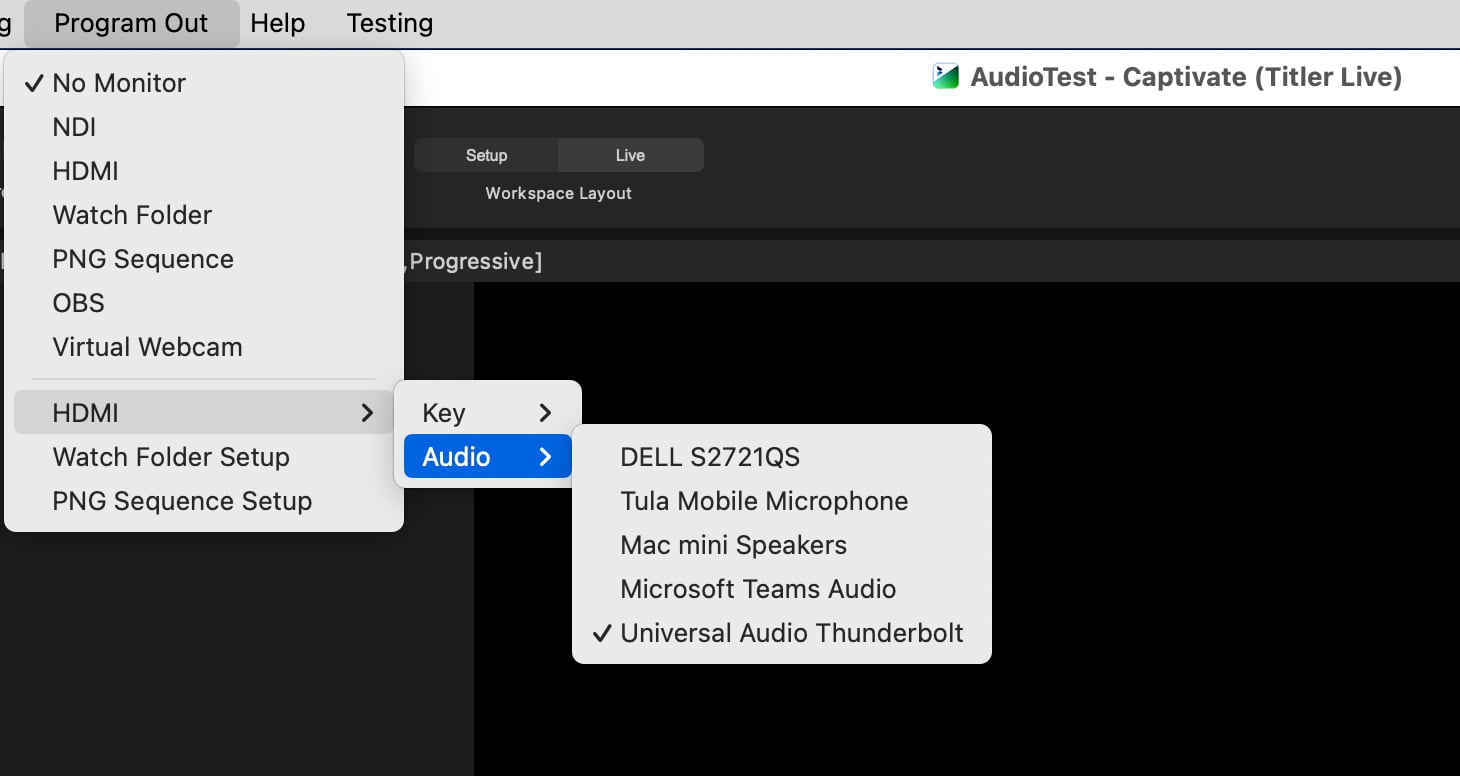
A specific audio output device can be assigned for the Display output. In many cases this means sending the audio to the same device the video goes out on, so the audio travels with the Display output (HDMI, DisplayPort, or other monitor connection).
You can set the audio device in two places:
* In the Captivate playout window, click the **Program Out** menu, choose **Display Setup → Audio**, and select the audio output:
* In the Display window itself, select the audio output from the settings:
The mix that plays out is the Program audio mix; set source levels in the [Audio Mixer panel](/set-up-your-production/chapter-index-5/the-audio-mixer.md).
## Multi-region Display output
When zone layouts are enabled in your Captivate license, regions of your project can be mapped to specific physical screens — a video wall, a stadium board plus a locker-room feed, or any setup where different parts of the frame go to different displays.
A **Display Region** is defined in the zone layout: give a zone a `Display` user tag, and the tag’s value becomes the region’s name. Zones that share the same tag value are combined into a single region.
To assign regions to screens:
1. Click the **Program Out** menu and choose **Display Setup** → **Assign Display Regions…**. The **Assign Display Regions** dialog opens with two panels: **Project Display Layout** on top — your project’s frame with its Display Regions (or a single **Whole Project** region when the layout defines none) — and **Display Devices** below, showing the screens currently connected.
2. Drag a Display Region from the project layout onto one or more displays. A region can go to several displays, and a display can hold several regions — they render stacked top to bottom.
3. To change a display’s stacking order, select a region on the display and use the Up/Down arrow keys; press Delete to unassign it.
4. Click **Apply**.
If the dialog reports that no Display Regions are defined in the current Zone Layout, add a `Display` user tag to at least one zone in the layout first.
{% hint style="info" %}
When the active zone layout defines Display Regions, per-screen assignment happens only in this dialog — the single-screen **Video** picker in the Display Setup menu is hidden.
{% endhint %}
Region-to-screen assignments persist across a restart: when Captivate launches and loads your recent project, the output windows return to their assigned screens without reassignment.
## See also
* [Set the project format](/set-up-your-production/set-up-your-project.md) — how the alpha and premultiplied options in your project affect every output destination.
---
# Agent Instructions
This documentation is published with GitBook. GitBook is the documentation platform designed so that both humans and AI agents can read, navigate, and reason over technical content effectively. Learn more at gitbook.com.
## Querying This Documentation
If you need additional information that is not directly available in this page, you can query the documentation dynamically by asking a question.
Perform an HTTP GET request on the current page URL with the `ask` query parameter, and the optional `goal` query parameter:
```
GET https://captivatehelp.newbluelive.com/set-up-your-production/chapter-index/output-graphics-to-a-display.md?ask=&goal=
```
`ask` is the immediate question: it should be specific, self-contained, and written in natural language.
`goal` is optional and describes the broader end goal you are ultimately trying to accomplish on behalf of the user. GitBook uses it to tailor the answer towards what is most useful for that goal.
The response will contain a direct answer to the question and relevant excerpts and sources from the documentation.
Use this mechanism when the answer is not explicitly present in the current page, you need clarification or additional context, or you want to retrieve related documentation sections.