> For the complete documentation index, see [llms.txt](https://captivatehelp.newbluelive.com/llms.txt). Markdown versions of documentation pages are available by appending `.md` to page URLs; this page is available as [Markdown](https://captivatehelp.newbluelive.com/set-up-your-production/chapter-index-5/the-audio-mixer.md).
# Audio Mixer panel
> *Availability — included in Broadcast and Enterprise.*
The **Audio Mixer** panel controls the audio sources that contribute to Program. Use it to set source levels, mute sources, monitor audio locally, and control the master Program mix.
Shot Layouts can also automate the mix as you move from shot to shot — a separate workflow from this panel; see [Automate audio with Shot Layouts](/set-up-your-production/chapter-index-5/automate-audio-with-shot-layouts.md). On this panel, each source’s **Override** button decides whether a shot’s stored audio drives that source.
## Program audio, monitor audio, and shot automation
* **Program audio** is the audio Captivate sends with its output. The Audio Mixer controls the Program audio mix.
* **Monitor audio** is what you hear locally through speakers or headphones. Changing the monitor device or muting a source in the monitor does not change Program audio.
* **Shot Layouts** can automate the Program mix. When you take a Shot Layout, Captivate can apply the audio levels, mute states, or pan settings stored with that shot.
## Add audio sources
Captivate can use audio devices that are connected to your computer and available to the system. Add the sources you want to use to the Project List; audio-bearing sources then appear in the Audio Mixer.
1. Right-click in the **Project List** and choose **New** > **Live Audio/Video** > **Audio Device**, then choose your source.
2. Repeat for each audio source you want to include in Program.
## Per-source controls
Each source strip in the Audio Mixer carries a meter and gain fader, a **Mute | Solo** switch (**M** | **S**), and — when a Shot Layout drives the source — an **Override** button.
* **Gain fader** — drag to set how much of this source is sent to the Program mix. The fader runs from -72 dB up to +12 dB, with 0 dB near the top of its travel. Scroll the mouse wheel over the fader for fine moves; right-click it and choose **Reset to 0 dB** to return to unity.
* **Mute (M)** — the left half of the switch mutes the source in the Program mix. It lights red while the source is muted.
* **Solo (S)** — the right half solos the source in your local monitor: you hear that source alone, and the other strips dim. Solo changes only what you hear — the Program mix that goes to air is untouched.
* **Override** — controls whether Shot Layout audio automation drives this source. See [Automate audio with Shot Layouts](/set-up-your-production/chapter-index-5/automate-audio-with-shot-layouts.md).
{% hint style="info" %}
The meter scale runs from -64 dB to +7 dB. The scale extends above 0 dB because Captivate processes audio in floating point; treat 0 dB as the practical ceiling.
{% endhint %}
Source meters read each source’s own level and don’t move with the Master fader; the **Master** strip meters the final Program mix.
{% hint style="info" %}
Every audio-bearing source on the active channel gets its own fader — there is no limit on the number of faders. The Audio Mixer is scoped to the active channel, so each channel shows only the sources that are live on it; a source that goes offline is hidden until it reconnects.
{% endhint %}
A small arrow toggle at the top of the panel collapses the per-source faders so only the Master fader is visible. Click it again to restore the source row.
## Master fader
The fader strip on the right of the panel labeled **Master** controls the overall Program audio mix — the audio that travels with Program output to destinations that carry audio. The Master strip has its own mute switch: it silences the entire Program mix, and the mixer dims while it’s engaged. Monitor audio is controlled separately; see [Choose the monitor audio device](#choose-the-monitor-audio-device).
## Choose the monitor audio device
The monitor device is where local monitoring plays — what you hear at your station. It does not change the Program audio mix.
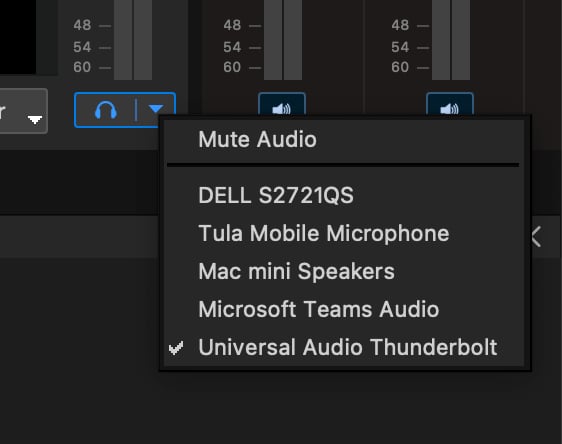
1. In the Audio Mixer, right-click the headphones or click the arrow next to it, and choose the monitoring device.
**📌 NOTE**\
On macOS, a multichannel audio interface appears as one device per stereo pair — pick the pair you monitor through. Your selection persists across sessions.
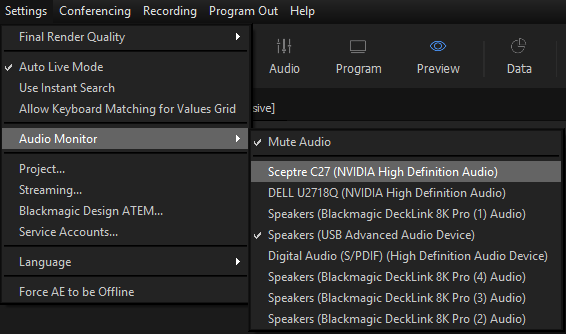
2. Or go to **Settings** > **Audio Monitor** and select from the available devices.
## Mute a source in local monitoring only
Use **Mute audio in monitor** when a source should still contribute to Program but should not be heard through local monitoring.
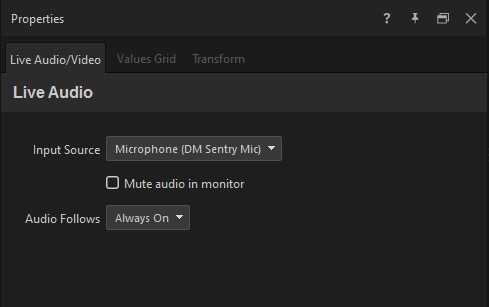
Select the source and, in its **Live Audio/Video** properties, check **Mute audio in monitor**. The source stays adjustable in the Audio Mixer and keeps feeding Program; it just isn’t heard at your station.
## Audio Follows Video
Use **Audio Follows** to make an audio source active only when a selected video source is live. This is useful when cameras or live video sources each have their own audio feed and you want the audio mixed in only while the matching video is on.
The **Audio Follows** option is on the source’s **Live Audio/Video** tab, alongside the **Mute audio in monitor** checkbox:
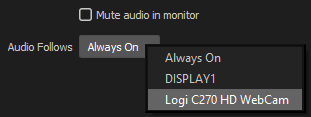
Click **Audio Follows** to see your options:
The list shows all available live video sources along with **Always On**. Choose **Always On** to keep the audio available and mix it manually, or choose a video source to have the audio turn on only when that video source is live.
{% hint style="info" %}
Shot Layout audio automation takes priority over Audio Follows. If a Shot Layout controls the source’s audio, the shot’s stored audio settings override the Audio Follows behavior.
{% endhint %}
## Display output audio
The Audio Mixer controls the Program audio mix. To choose which audio device the Display output uses, go to **Program Out** > **Display Setup** > **Audio**, or use the Display window’s settings. See [Output graphics to a display](/set-up-your-production/chapter-index/output-graphics-to-a-display.md).
## Diagnosing audio issues
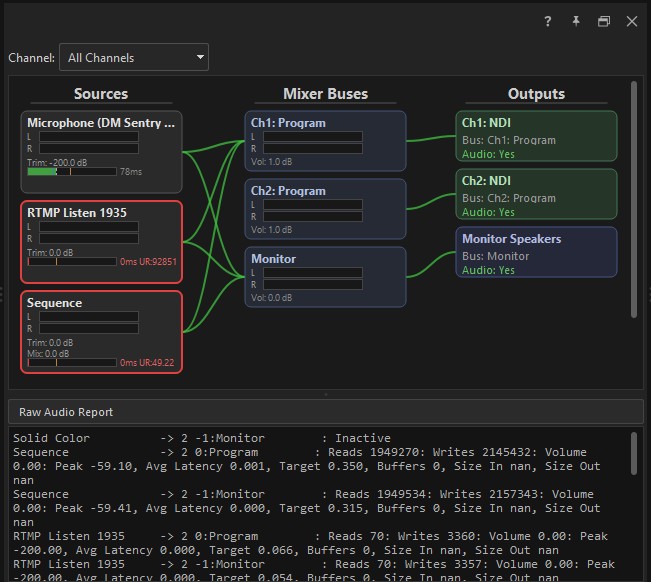
When audio doesn’t behave the way you expect — no audio on air, echo, glitches, or one source sitting at the wrong level — open the **Audio Visualizer**. It draws every audio source, mixer bus, and output in one picture with the live signal flowing through each connection, so you can see where audio is being muted, mis-routed, or clipping. Open it from the **View** menu.
See [Use the Audio Visualizer](/troubleshooting/use-the-audio-visualizer.md) for how to read it.
## Related
* [Program Monitor panel](/get-started/chapter-index-2/program-monitor-panel.md)
* [Program Monitor audio controls](/reference/program-monitor-audio-controls.md)
* [Shot Layouts & Shot Launcher](/control-your-show/chapter-index-1.md)
* [Output graphics to a display](/set-up-your-production/chapter-index/output-graphics-to-a-display.md)
---
# Agent Instructions
This documentation is published with GitBook. GitBook is the documentation platform designed so that both humans and AI agents can read, navigate, and reason over technical content effectively. Learn more at gitbook.com.
## Querying This Documentation
If you need additional information that is not directly available in this page, you can query the documentation dynamically by asking a question.
Perform an HTTP GET request on the current page URL with the `ask` query parameter, and the optional `goal` query parameter:
```
GET https://captivatehelp.newbluelive.com/set-up-your-production/chapter-index-5/the-audio-mixer.md?ask=&goal=
```
`ask` is the immediate question: it should be specific, self-contained, and written in natural language.
`goal` is optional and describes the broader end goal you are ultimately trying to accomplish on behalf of the user. GitBook uses it to tailor the answer towards what is most useful for that goal.
The response will contain a direct answer to the question and relevant excerpts and sources from the documentation.
Use this mechanism when the answer is not explicitly present in the current page, you need clarification or additional context, or you want to retrieve related documentation sections.