> For the complete documentation index, see [llms.txt](https://captivatehelp.newbluelive.com/llms.txt). Markdown versions of documentation pages are available by appending `.md` to page URLs; this page is available as [Markdown](https://captivatehelp.newbluelive.com/get-started/welcome/first-graphic-smoke-test.md).
# Put your first graphic on air
In this article you’ll put a graphic on air and verify that Captivate is working correctly. This is a good first exercise after installation, and a quick way to confirm that a computer is ready for production.
You need Captivate installed and activated, plus at least one output you can verify — a connected display, NDI, OMT, OBS, SDI, or the Virtual Webcam.
## Step 1: Launch Captivate
Launch Captivate. Close the **Getting Started** dialog if it appears.
If you see the **Activation Is Required** dialog instead, finish activation first via the **Launch Application Manager** button. See [Activation flow reference](/reference/license-activation-flow.md).
## Step 2: Pick a graphic from the Library
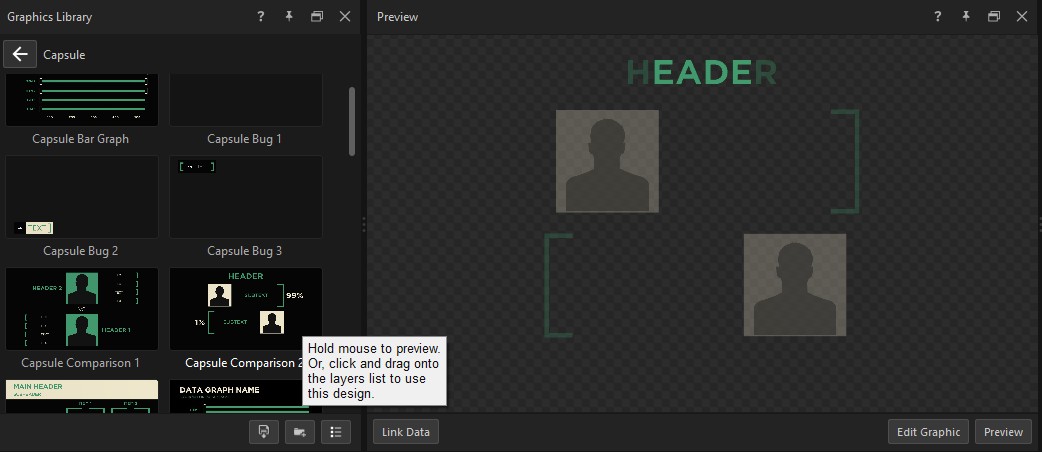
1. Make sure the **Library** panel is visible. If it isn’t, press **F4** or click the Library icon in the top bar.
2. Browse to any collection.
3. Hover the cursor over any preset — the graphic loads and animates in the Preview panel so you can see what it looks like before adding it.
## Step 3: Add the graphic to the Project List
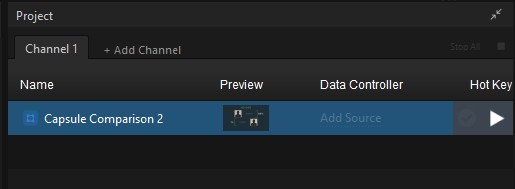
Drag the preset from the Library into the **Project List**. Captivate adds it as a layer on the current channel.
## Step 4: Choose an output
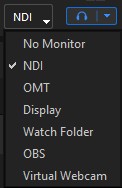
1. Open the **Program Out** menu.
2. Choose an output you can verify:
* **Display** — sends to a connected monitor. Easiest to confirm.
* **NDI** — pick up the stream in NDI Studio Monitor on the same network.
* **OMT** — Open Media Transport, a low-latency network video transport with audio.
* **OBS** — appears as a source inside OBS via the NewBlue OBS plugin.
* **Virtual Webcam** — appears as a camera in Zoom, Teams, Meet, OBS, browsers.
* **SDI** — to a Blackmagic DeckLink or AJA card (when the hardware is connected).
## Step 5: Play it
1. In the Project List, click the play button on the row for your graphic.
2. Watch the **Program Monitor** — the graphic should animate in.
3. Check your downstream receiver (the connected display, NDI Studio Monitor, OBS, etc.) — the same frame should appear there.
If the graphic plays in the Program Monitor and on your receiver with no watermark, the install is healthy.
## Common problems
If something didn’t work, follow the link for the symptom you’re seeing:
* **Unlicensed banner won’t clear** — open the Application Manager to confirm activation, then see [Activation flow reference](/reference/license-activation-flow.md) for the banner state machine and how to force a re-read.
* **Watermark on output** — you’re using a feature your license doesn’t include. The top bar names the feature. See [Feature availability by edition](/reference/entitlements-sku-matrix.md).
For other output or device problems, see [Troubleshooting](/troubleshooting/branch-index.md).
## Next step
Now that you’ve played a graphic by hand, the next step is to connect it to live data. Continue with [Play and update graphics](/play-and-update-graphics/branch-index.md).
## Related
* [Tour the Captivate interface](/get-started/chapter-index-2/the-playout-interface.md) — a quick orientation to the Setup and Live workspace layouts and the main panels.
* [Top-bar status indicators](/get-started/chapter-index-2/top-bar-status-meaning.md) — what every indicator on the top bar means.
---
# Agent Instructions
This documentation is published with GitBook. GitBook is the documentation platform designed so that both humans and AI agents can read, navigate, and reason over technical content effectively. Learn more at gitbook.com.
## Querying This Documentation
If you need additional information that is not directly available in this page, you can query the documentation dynamically by asking a question.
Perform an HTTP GET request on the current page URL with the `ask` query parameter, and the optional `goal` query parameter:
```
GET https://captivatehelp.newbluelive.com/get-started/welcome/first-graphic-smoke-test.md?ask=&goal=
```
`ask` is the immediate question: it should be specific, self-contained, and written in natural language.
`goal` is optional and describes the broader end goal you are ultimately trying to accomplish on behalf of the user. GitBook uses it to tailor the answer towards what is most useful for that goal.
The response will contain a direct answer to the question and relevant excerpts and sources from the documentation.
Use this mechanism when the answer is not explicitly present in the current page, you need clarification or additional context, or you want to retrieve related documentation sections.