> For the complete documentation index, see [llms.txt](https://captivatehelp.newbluelive.com/llms.txt). Markdown versions of documentation pages are available by appending `.md` to page URLs; this page is available as [Markdown](https://captivatehelp.newbluelive.com/get-started/chapter-index-2/values-grid-tab-reference.md).
# Values Grid tab
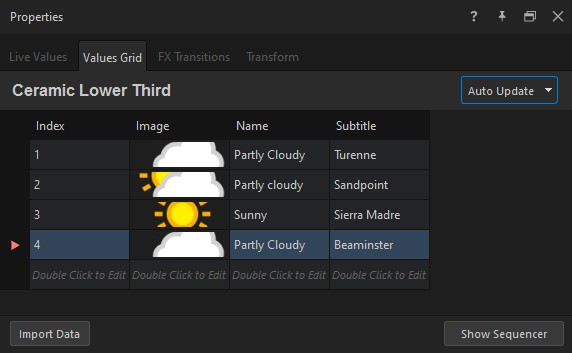
When one graphic needs to show several different versions during a show, the **Values Grid** tab is how you prepare them ahead of time and switch among them while the graphic is live — one lower third can hold rows for several speakers, one sponsor bug rows for several sponsors, one player graphic rows for a whole roster. Switching rows updates the graphic without replacing it.
The tab stores prepared rows of values for the selected Project List item. For a graphic, each row can hold a different set of values for the graphic’s **Update Live** variables. For a live input, rows can switch the selected input source.
The far-left **Index** column identifies each row. The remaining columns come from variables in the graphic that can **Update Live** while the graphic is on air. Play a row by clicking its row header, recall it by Index, or use the Sequencer to advance through rows on a timer.
This page documents the controls on the tab. For the introductory tutorial, see [Prepare multiple variations](/play-and-update-graphics/chapter-index/3-prepare-variations.md). For the operate-time playback view, see [Values Grid](/control-your-show/chapter-index/values-grid.md).
## Update Live variables become value columns
In a graphic Values Grid, the value columns come from the graphic’s **Update Live** variables. A graphic with **Update Live** values for **Name**, **Headshot**, and **Accent** shows columns for those values, plus the **Index** column at the far left.
Static variables are not listed in the Values Grid because they cannot change while the graphic is on air.
To rename a value column, rename the underlying variable in the [Designer](/design-and-customize-graphics/chapter-index-1.md).
## Index column
The **Index** column appears at the far left of the Values Grid, added by Captivate to identify each row. Use it to assign a number to a row.
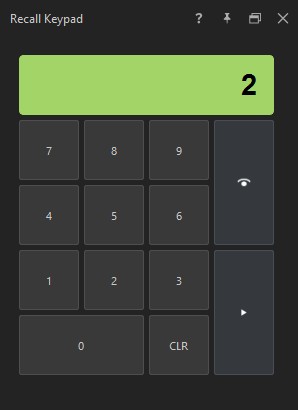
During a show, you can type that number in the **Recall Keypad** window, or on a physical numeric keypad, to recall the matching row quickly — the keypad’s **Preview** button cues the row without taking it on air, and **Play** takes it. See [Recall Keypad](/control-your-show/chapter-index-1/recall-keypad.md).
When importing data, Captivate can use a source column named `index` or `idx` to fill the grid’s **Index** column.
## Cell editors
The editor inside each cell matches the variable’s type:
* Text → text editor
* Solid color → color picker
* Gradient → gradient picker
* Image or texture → image picker
* Data graph → numeric edit
* Live video → input source picker
* Visibility → on/off toggle
* Checkbox → boolean checkbox
## Values Grid on live inputs
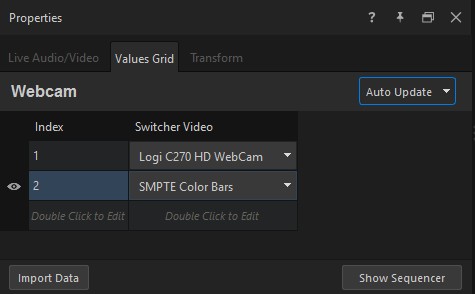
Live inputs have a Values Grid too. Its rows switch the input source: the grid shows a **Switcher Video** column whose cells are source pickers, so each row selects a different camera, NDI feed, or test pattern. Play a row to switch the input to that source — the same row-playback gestures and Sequencer apply.
## Play a row
Click a row’s header at the left edge of the grid to play or preview that row, depending on the current update mode. You can also recall a row by typing its **Index** value in the **Recall Keypad** window or on a numeric keypad.
* In **Auto Update** mode, the row’s values go to Program immediately, playing the graphic’s update animation.
* In **Manually Update** mode, the row plays to the Preview panel instead. Check it there, then send it to Program with the **Update changes without animation** or **Update changes with animation** button in the Properties panel header.
## Row state icons
The row header at the left of the grid marks row state:
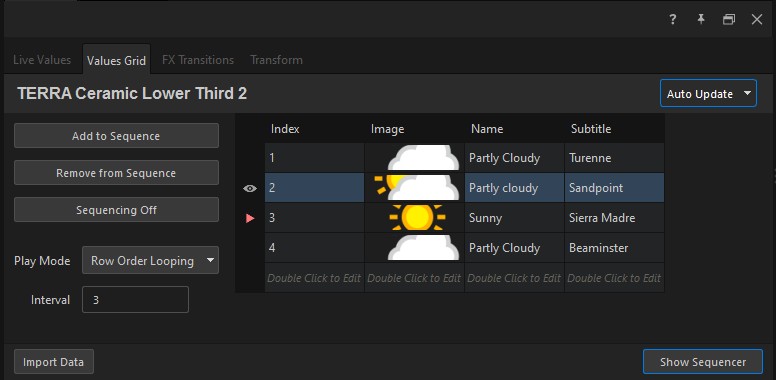
* **Sequenced** rows (rows added to the Sequencer’s order) carry a darker fill.
* The **playing** row overlays a play icon on top of the row header.
* The **previewed** row overlays an eye icon on top of the row header.
## Add a row
The Values Grid has no Add Row button. Use one of the following gestures:
* Double-click a cell in the empty row at the bottom of the grid. The grid appends a new row.
* Right-click any existing row and choose **Insert Row Above**. The new row appears above the selected row.
* Use **Import Data** to bulk-load rows from a file (see below).
New rows are pre-filled with type-aware defaults: textures default to white (`#FFFFFF`), numeric data graphs default to `0`, other types default to empty.
## Remove a row
Right-click the row and choose **Remove Row**. The row is removed immediately. There is no undo from the Values Grid.
## Import Data
The **Import Data** button reads tabular data into the grid from a file.
1. Click **Import Data**.
2. Choose a **.csv**, **.xlsx**, **.xml**, or **.json** file.
3. The grid is rebuilt from the file’s contents.
If the imported file includes a column named `index` or `idx`, Captivate uses it to fill the grid’s **Index** column.
**⚠️ WARNING**
**Import Data overwrites the grid.** Every existing row is replaced with the rows from the file. There is no append option and no confirmation prompt. Save your project first if the grid already holds rows you want to keep.
If the file cannot be parsed, an **Error Importing Table Data** dialog appears and the grid is left unchanged.
## Copy and paste cells
Select a cell or range and use the standard copy and paste shortcuts. Copying a row copies every column in that row. Pasting writes into the cells starting at the current selection.
## The Sequencer
Click **Show Sequencer** to open the Sequencer side panel. The Sequencer walks rows on a timer; you control which rows participate, in what order, and at what interval.
### Choose which rows participate
1. Select one or more rows in the grid.
2. Click **Add to Sequence** to add them to the sequence in selection order. Sequenced rows show a darker fill in the row header.
3. To take rows out of the sequence, select them and click **Remove from Sequence**.
### Choose a Play Mode
The **Play Mode** dropdown has four options:
* **Row Order** — play every row in the grid once, top to bottom.
* **Row Order Looping** — same as Row Order, then loop back to the top.
* **Seq Order** — play only the sequenced rows, in the order you added them, once.
* **Seq Order Looping** — same as Seq Order, then loop.
**Seq Order** and **Seq Order Looping** play nothing if you have not added rows to the sequence.
### Set the Interval
The **Interval** field sets the seconds between rows. The default is **3**. The field accepts whole numbers from **1** to **9999** — fractional seconds are not supported.
### Start and stop the Sequencer
The **Sequencing Off** / **Sequencing On** toggle starts and stops sequencer playback. Choosing a Play Mode does not start playback on its own; the toggle must be on.
## Live update behavior
When your license includes live updates and the Properties panel is set to **Manually Update**, Captivate holds Values Grid changes — cell edits and row selections alike — so you can check them in the Preview panel before sending them to Program. Send them with one of the two icon buttons in the Properties panel header: the **no-animation** button (tooltip: "Update changes without animation.") or the **with-animation** button (tooltip: "Update changes with animation.").
In **Auto Update** mode, playing a row goes to Program immediately. Cell edits preview first, and reach Program only when the edited row is already on air — editing any other row changes its stored values without airing it.
## Related
* [Prepare multiple variations](/play-and-update-graphics/chapter-index/3-prepare-variations.md)
* [Values Grid](/control-your-show/chapter-index/values-grid.md)
* [Recall Keypad](/control-your-show/chapter-index-1/recall-keypad.md)
* [Live Values tab](/control-your-show/chapter-index/live-data-tab.md)
* [Properties panel](/get-started/chapter-index-2/properties-panel.md)
---
# Agent Instructions
This documentation is published with GitBook. GitBook is the documentation platform designed so that both humans and AI agents can read, navigate, and reason over technical content effectively. Learn more at gitbook.com.
## Querying This Documentation
If you need additional information that is not directly available in this page, you can query the documentation dynamically by asking a question.
Perform an HTTP GET request on the current page URL with the `ask` query parameter, and the optional `goal` query parameter:
```
GET https://captivatehelp.newbluelive.com/get-started/chapter-index-2/values-grid-tab-reference.md?ask=&goal=
```
`ask` is the immediate question: it should be specific, self-contained, and written in natural language.
`goal` is optional and describes the broader end goal you are ultimately trying to accomplish on behalf of the user. GitBook uses it to tailor the answer towards what is most useful for that goal.
The response will contain a direct answer to the question and relevant excerpts and sources from the documentation.
Use this mechanism when the answer is not explicitly present in the current page, you need clarification or additional context, or you want to retrieve related documentation sections.