> For the complete documentation index, see [llms.txt](https://captivatehelp.newbluelive.com/llms.txt). Markdown versions of documentation pages are available by appending `.md` to page URLs; this page is available as [Markdown](https://captivatehelp.newbluelive.com/get-started/chapter-index-2/project-list-panel-and-channel-management.md).
# Project List panel
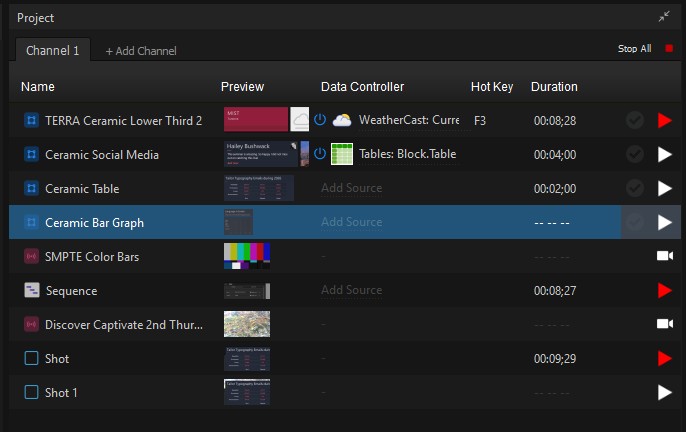
The Project List contains the items that make up your production. Use it to add and organize graphics, media files, and live video sources as visual layers, then play them during a show.
Other Project List items are not visible layers at all. Shot Layouts synchronize layer playout, transitions define how the Switcher moves between sources, and workflows offer high-level automation. They appear in the list alongside your layers, but they control or organize playout rather than contributing their own picture or sound. And audio items, of course, play sound without a visual element.
The row’s **Play** button puts playable items on air. Row order matters too — layers higher in the list render on top of layers below them.
The Project List is organized by channel. Most projects start with one channel. If you need separate show lists or outputs, see [Channels](/get-started/chapter-index-2/channels.md).
* [Add a graphic layer](#add-a-graphic-layer)
* [Add a media layer](#add-a-media-layer)
* [Add a live video layer](#add-a-live-video-layer)
* [Add a live audio layer](#add-a-live-audio-layer)
* [Rename, reorder, and delete items](#rename-an-item)
* [Columns](#columns)
* [Row context menu](#row-context-menu)
* [Bottom toolbar](#bottom-toolbar)
* [Render status and caching](#render-status-and-caching)
## Add items to the Project List
The fastest paths for adding items:
* Drag a graphic from the Library, or files from your file browser, onto the Project List. The item inserts at the position you drop it.
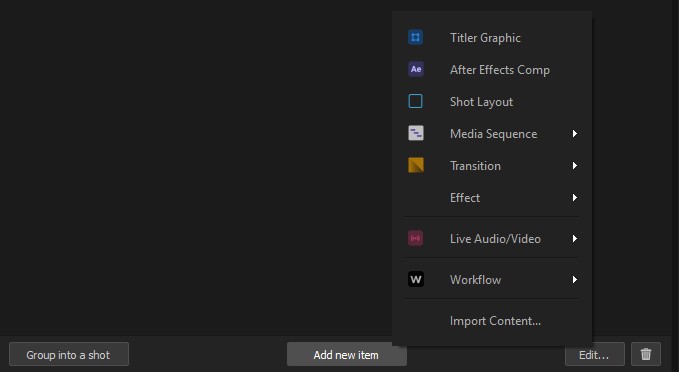
* Click **Add new item** at the bottom of the panel and pick a type.
* Right-click a row and use the **New** or **Import** submenus. Available commands depend on the selected item and your Captivate license.
To add the non-layer item types, see their own articles: [Shot Layouts](/control-your-show/chapter-index-1/creating-shot-layouts.md), [transitions](/set-up-your-production/chapter-index-3/setting-up-transitions.md), and [workflows](/control-your-show/chapter-index-2.md).
### Add a graphic layer
1. Open the Library panel.
2. Click and drag a design from the Library onto the Project List. The new layer inserts at the position you drop it — drop between two rows to insert there, or drop below the last row to append.
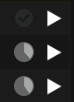
After you add a graphic, Captivate prepares it for playback. The row’s status circle shows a clock while rendering and settles into a subtle grey checkmark when the graphic is ready.
**❗ IMPORTANT**\
Wait for the render status to finish before taking the layer live, so the graphic plays smoothly.
To change the graphic’s text, colors, or images, click the layer and update its values in the Properties panel. See [Live Values tab](/control-your-show/chapter-index/live-data-tab.md). The graphic is now ready to preview or play.
### Add a media layer
Drag an audio, image, or video file from your file browser onto the Project List, or right-click a row and choose **Import** > **Media**. You can drag several files at once; each inserts at the drop point.
### Add a live video layer
Right-click any row and choose **New** > **Live Audio/Video**, then pick an input category (NDI, capture device, browser, screen, and so on). You can also use **Add new item** > **Live Audio/Video** from the bottom toolbar. See [Use live video sources](/set-up-your-production/chapter-index-2/play-live-video-source-layers.md).
### Add a live audio layer
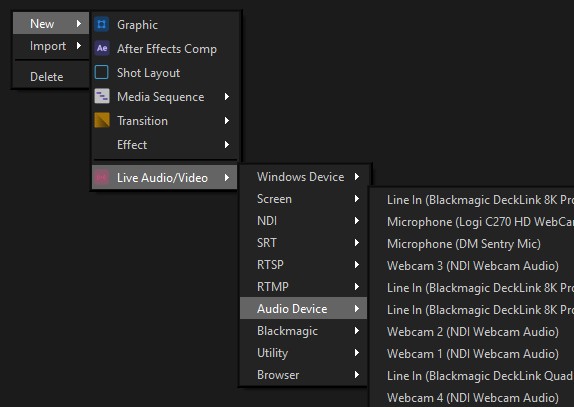
Right-click any row and choose **New** > **Live Audio/Video** > **Audio Device**, then pick the audio input you want.
## Manage items
### Rename an item
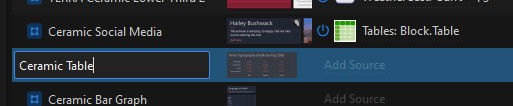
1. Double-click the item’s name in the **Name** column.
2. Enter a new name.
3. Press **Tab** or **Enter** to save it.
### Reorder items
* Click and drag an item to a new position in the Project List.
* Or right-click an item and choose **Move Up** or **Move Down**.
### Delete items
Right-click the item, choose **Delete**, and click **Yes** to confirm. You can also select one or more rows and click the trash icon in the bottom toolbar.
### Swap one graphic for another
Captivate does not replace a layer when you drag a Library graphic onto an existing row — the new layer inserts above or below the row instead. To swap graphics, delete the old layer, then add the replacement in the same position.
## Columns
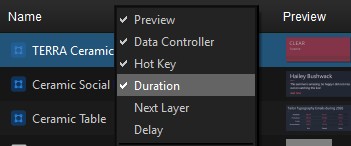
* **Name** — the item’s name. Double-click to rename.
* **Preview** — a thumbnail of the item. Double-click the thumbnail to open the [Designer](/design-and-customize-graphics/chapter-index-1.md) on that graphic (when your license includes the Designer).
* **Data Controller** — the Data Controller bound to the item’s variables, if any. Click the controller’s icon to open its panel.
* **Hot Key** — the key chord that triggers the row’s playout command.
* **Duration** — the maximum playout duration, including animations in and out.
* **Next Layer** — the layer to play after this one. Available only when the row has a finite **Duration**; the layer plays for that duration, then jumps to the chosen **Next Layer**.
* **Delay** — pause between this layer ending and **Next Layer** starting. Available only when both **Duration** and **Next Layer** are set.
Right-click any column header to open the column menu and toggle individual columns on or off.
Below the column toggles, the same menu has a **Sequence Exclusivity** check item. Turning it on adds a small per-row button to every item; the button marks the item as a member of a mutual-exclusivity group so that only one such item plays at a time during playout.
## Row context menu
Right-click a row to open the context menu. The set of entries depends on your license and the item type:
* **New** — submenu for inserting an item above the row. Contents include **Graphic**, **After Effects Comp**, **Shot Layout**, **Media Sequence** (a submenu with **Sequence List** and **Watch Folder**), **Transition** (a submenu of transition templates), **Effect** (a submenu of effect templates), and **Live Audio/Video** (its own submenu of input categories: Windows Device, Screen, NDI, SRT, RTSP, RTMP, Audio Device, Blackmagic, Utility, Browser). Entries appear only when your license supports them — Live Audio/Video requires the video-input feature, After Effects requires AE support, and so on.
* **Import** — submenu with **Layer…**, **Graphic…**, **Media…**, **After Effects…**, and **Shot Layout…**
* **Save Layer…** — saves the item to the Graphics Library. Requires a license that includes the Designer.
* **Save Shot Layout…** — appears on Shot rows.
* **Manage Shots** — submenu with **Add to** and **Remove from** lists of the existing Shots in the project. Use it to make the selected item(s) members of one or more Shot Layouts.
* **Rename** — renames the item.
* **Duplicate** — copies the row.
* **Move Up** / **Move Down** — reorder the row.
* **Re-cache Graphic** — rebuilds the graphic’s cache.
* **Edit…** — opens the Designer on the item. Requires a license that includes the Designer.
* **Enable As Transition** / **Disable As Transition** — promotes or demotes a graphic into a transition for the Switcher. Appears on graphic and media items.
* **Lock Playout** / **Unlock Playout** — pins a live video layer to Program. Requires a license that includes downstream keying.
* **Show in Explorer** (Windows) / **Reveal in Finder** (macOS) — opens the file location for media-backed and graphic items. The label includes the actual filename.
* **Delete** — removes the item.
Data Controllers can add their own actions to the bottom of the menu when the controller is bound to the selected row.
## Bottom toolbar
The bottom of the Project List panel hosts the always-on controls for adding and editing project items. From left to right:
* **Group into a shot** — collects the selected layers into a single Shot Layout.
* **Add new item** — opens a single popup that lists every item type you can add: **Titler Graphic**, **After Effects Comp**, **Shot Layout**, **Media Sequence**, **Transition**, **Effect**, **Live Audio/Video**, **Workflow**, plus **Import Content…** Entries appear only when your license supports them. This is the fastest way to add an item without using the row context menu or dragging from the Library.
* **Edit…** — opens the selected item in the appropriate editor (graphics open in the Designer).
* **Delete** (trash icon) — removes the selected items.
## Render status and caching
Captivate renders a graphic layer after you add it to a channel. The row’s status circle starts grey, shows a filling clock indicator while the graphic is rendering, and settles into a subtle grey checkmark when the graphic is fully cached.
A graphic layer re-renders when you change a value to a new one. Setting a value back to what it already was does not trigger a re-render — Captivate keeps the cached frames around.
To force a rebuild, right-click the row and choose **Re-cache Graphic**.
## Related
* [Channels](/get-started/chapter-index-2/channels.md) — separate show lists, channel management, and output mapping.
* [Library panel](/get-started/chapter-index-2/library-panel.md) — find a title design to drag in.
* [Play graphic layers in a specific sequence](/control-your-show/chapter-index/cue-and-take-graphics.md) — playout order, hotkeys, and sequencing.
---
# Agent Instructions
This documentation is published with GitBook. GitBook is the documentation platform designed so that both humans and AI agents can read, navigate, and reason over technical content effectively. Learn more at gitbook.com.
## Querying This Documentation
If you need additional information that is not directly available in this page, you can query the documentation dynamically by asking a question.
Perform an HTTP GET request on the current page URL with the `ask` query parameter, and the optional `goal` query parameter:
```
GET https://captivatehelp.newbluelive.com/get-started/chapter-index-2/project-list-panel-and-channel-management.md?ask=&goal=
```
`ask` is the immediate question: it should be specific, self-contained, and written in natural language.
`goal` is optional and describes the broader end goal you are ultimately trying to accomplish on behalf of the user. GitBook uses it to tailor the answer towards what is most useful for that goal.
The response will contain a direct answer to the question and relevant excerpts and sources from the documentation.
Use this mechanism when the answer is not explicitly present in the current page, you need clarification or additional context, or you want to retrieve related documentation sections.